How to make Butter – Homemade Butter in a Jar
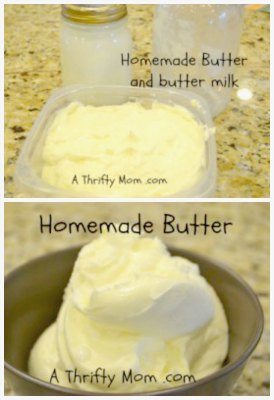
It’s Matt. I made Butter in a Jar back when I was a kid at a youth activity. Making butter at home was very easy and just took some time. So the other day at the store I grabbed some Heavy Whipping Cream and planned a night with the kids to make show them how to make homemade butter. It is really easy and will provide some tasty and easily homemade butter!


Ingredients:
- Heavy Whipping Cream – any amount 6 cups makes about 1 pound of butter
- Salt – 1/2 teaspoon per pound of butter- optional, used for preserving butter
- Jar – with lid, any size, baby food jars are great for kids to make it with
 Directions:
Pour Heavy Whipping Cream into jars no more then 3/4 the way full. It is best to leave room for the shaking and turning action. Next begin shaking! And Shake and Shake. Some music to shake too makes it fun for the kids and helps pass time. Something with a fun and quick beat. The best way I figured to shake the jar was to hold it length wise in my hands with the lid in my palms and the base of the jar wedge in my forearms.
It takes about 5 minutes before you notice a thickening forming in the jar. This heaviness is the beginning of the fat changing and sticking together. At this point you really just have a thick whip cream in the jar. Keep shaking. At this point the jar edges will look like:

As another 5-10 minutes pass you will notice the jar filling with the foamy cream. It feels as if there is no room in the jar as the thick Heavy Cream is aerated even more with the shaking, but keep shaking. It will look like this:


- Ingredients:
- Heavy Whipping Cream - any amount 6 cups makes about 1 pound of butter
- Salt - ½ teaspoon per pound of butter- optional, used for preserving butter
- Jar - with lid, any size, baby food jars are great for kids to make it with
- home made butter heavy whipping cream
- Pour Heavy Whipping Cream into jars no more then ¾ the way full. It is best to leave room for the shaking and turning action. Next begin shaking! And Shake and Shake. Some music to shake too makes it fun for the kids and helps pass time. Something with a fun and quick beat. The best way I figured to shake the jar was to hold it length wise in my hands with the lid in my palms and the base of the jar wedge in my forearms.
- It takes about 5 minutes before you notice a thickening forming in the jar. This heaviness is the beginning of the fat changing and sticking together. At this point you really just have a thick whip cream in the jar. Keep shaking. At this point the jar edges will look like:
- home made butter foam
- As another 5-10 minutes pass you will notice the jar filling with the foamy cream. It feels as if there is no room in the jar as the thick Heavy Cream is aerated even more with the shaking, but keep shaking.
- Keep shaking and don't stop you are almost done when it gets thick. I have heard some add a large marble to the thick foam. But I don't think it really matters. Just the pressure of the shaking will continue the fat to congeal together. Don't worry if you don't think the foam is "churning" or rotating in the jar, gravity and pressure is still working to form the butter.
- Before you know it you will see the foam separate and a thin liquid forms in the jar. That thin liquid is buttermilk! The butter is in the last few moments of shaking. Keep shaking until the butter or mass inside is a consistent size.
- home made butter buttermilk
- At this point you can separate the buttermilk out and save it for biscuits or pancakes and other fun recipes. Then you can add the ½ teaspoon salt which is optional. Some say the taste is different, but the main reason is to preserve the butter. Now with the remaining butter you can place it in a small container for refrigeration and easy of using it. So congrats you just made you own butter! Enjoy your work!
- home made butter bowl
- As the butter sets you may see drips of buttermilk on the butter. Just let it drip off and drain.

How to cut a whole watermelon into cubes in just a few minutes
How to make Ice Cream In A Bag
HOW TO FREEZE STRAWBERRIES ~ 5 EASY STEPS.
GARDEN TIPS ~ USE MUFFIN TIN TO CREATE PERFECTLY SPACED HOLES FOR PLANTING
REPLACE A WORN OUT TRAMPOLINE SAFETY PAD WITH POOL NOODLES ~ EASY DIY
How to keep bugs out of your drink at a BBQ or picnic
SHOE MATCHING GAME ~ HELPS KIDS GET THEIR SHOES ON THE CORRECT FOOT
HOW TO GET SHARPIE MARKER OFF YOUR SKIN ~ DIY FASTEST WAY TO REMOVE SHARPIE
The post Homemade Butter appeared first on A Thrifty Mom - Recipes, Crafts, DIY and more.


Comments
- Mechelle McWilliam maybe a rainy day project? by Suzanne Lombardi Lane Caldwell
- We did this with the fairy princess right before county fair in ... by Cathy Hastreiter Peltonen
- Plus 17 more...